Install the game.
Ok this seems like a straightforward process, however it can prove to be anything but easy. Firstly there are three different versions of the game; one bought through GOG, the other bought through Steam and a final version sold as a retail copy. No matter which version you have you can always gain access to the GOG copy of the game by following these steps.
Sometimes installation goes perfectly and the game runs fine, however other times the game just won't work properly and you will end up spending days trying to troubleshoot a game that crashes or spits out error messages. I recommend that if you begin to run out of patience (for me that was after 10 minutes) then try a clean reinstall of the game. if that doesn't work then a fresh windows install may solve your problems and trust me, I literally did this to get this game to run properly once.
This guide uses the GOG version of the game however the Steam version is probably fine too. I tried all three versions and found that the retail hard copy version was the most buggy so if you own this version then you may consider getting a free GOG copy. Be warned however that the disc and GOG versions are not the same so you can't copy paste files to save download time.
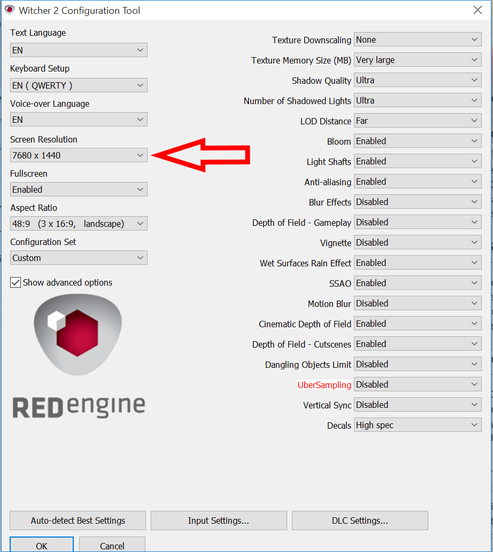
Once you have chosen which version of the game you want to use and performed the installation process (this includes installing updates to version 3.4 on the retail copy) run the game. This will take you to launcher. This is where you do all your graphics adjustments, there are no options in game. Configure your graphics and control scheme how you wish then launch the game once. when stating a new game there is a tutorial which will let you test out your new settings. Afterwards close the game and consider making a backup of your game files in case something goes wrong.
Sometimes installation goes perfectly and the game runs fine, however other times the game just won't work properly and you will end up spending days trying to troubleshoot a game that crashes or spits out error messages. I recommend that if you begin to run out of patience (for me that was after 10 minutes) then try a clean reinstall of the game. if that doesn't work then a fresh windows install may solve your problems and trust me, I literally did this to get this game to run properly once.
This guide uses the GOG version of the game however the Steam version is probably fine too. I tried all three versions and found that the retail hard copy version was the most buggy so if you own this version then you may consider getting a free GOG copy. Be warned however that the disc and GOG versions are not the same so you can't copy paste files to save download time.
Once you have chosen which version of the game you want to use and performed the installation process (this includes installing updates to version 3.4 on the retail copy) run the game. This will take you to launcher. This is where you do all your graphics adjustments, there are no options in game. Configure your graphics and control scheme how you wish then launch the game once. when stating a new game there is a tutorial which will let you test out your new settings. Afterwards close the game and consider making a backup of your game files in case something goes wrong.
Nexus Mod Manager.
Most of the mods for the game are managed most efficiently by The Nexus Mod Manager so install that next (see important software page link at this top of this page). After installation run the NMM go through the prompts and setup process until you get to the main screen, which looks like this, then you can close the manager.
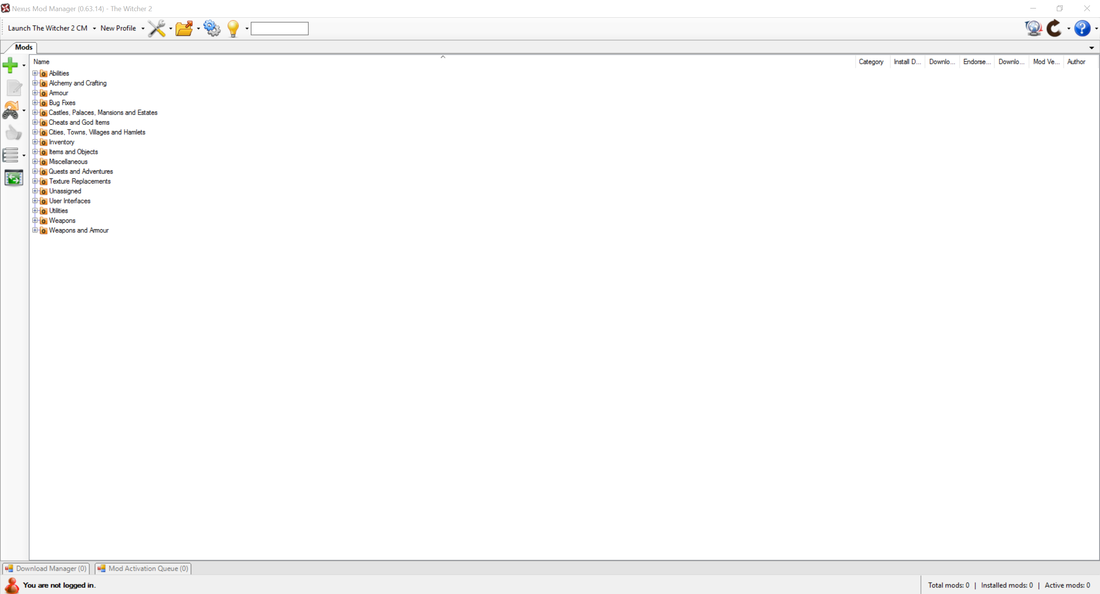
NMM main screen, this is where you will arrive after installation and setup.
Multi monitor & SLI users.
This game had some former issues with multi monitor surround resolutions however it has been updated and works well. On the latest drivers SLI scales extremely well between two cards. If you are running an older version of the game for some reason and are having issues on a surround display this thread will assist in rectifying these problems, though updating the game to the latest 3.4 patch is by far the best solution.
Downsampling.
Ok so you have installed the game, set up all of your graphics options but your gpu(s) are not getting pushed hard enough yet but you cannot enable ubersampling because of the fps hit? This is a good time to enable DSR if you are an nvidia user or create a custom resolution to render the game at a higher resolution. Keep in mind that ubersampling is essentially rendering the game at 4K and then downsampling for the final render so there is no point in using DSR/custom resolutions set to 4K, if that is the case you may as well continue using ubersampling. If you are using surround and still want to use DSR then this work around at the top of this page will allow you to do so. I personally was able to increase my resolution from a native 5760x1080 up to 7680x1440 and still keep playable framerates.
GAME MODDING.
Clean up the HUD.
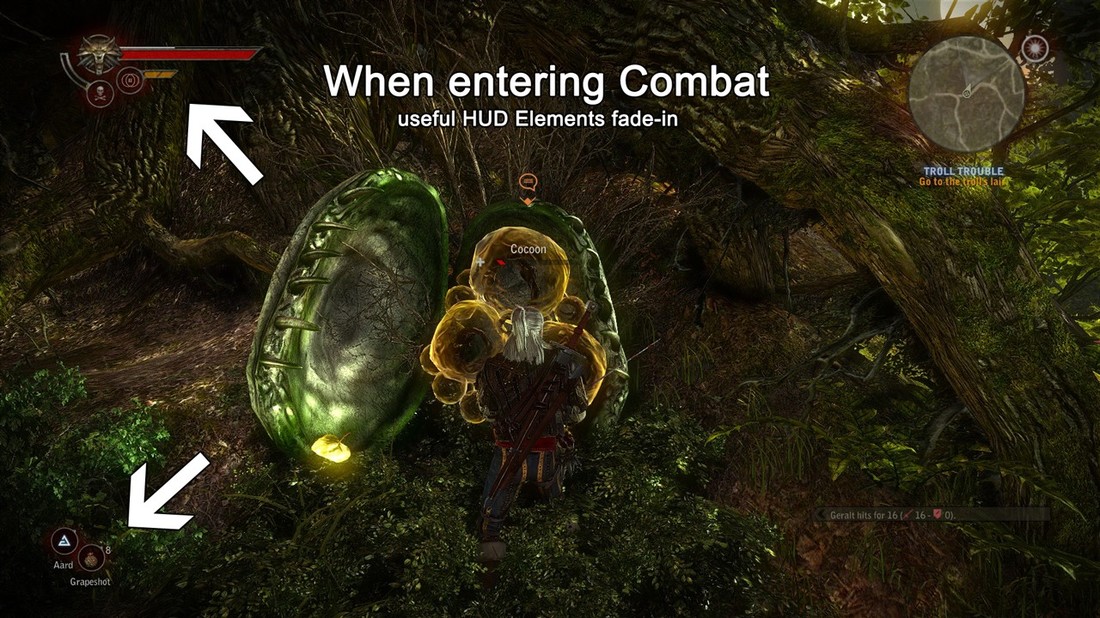
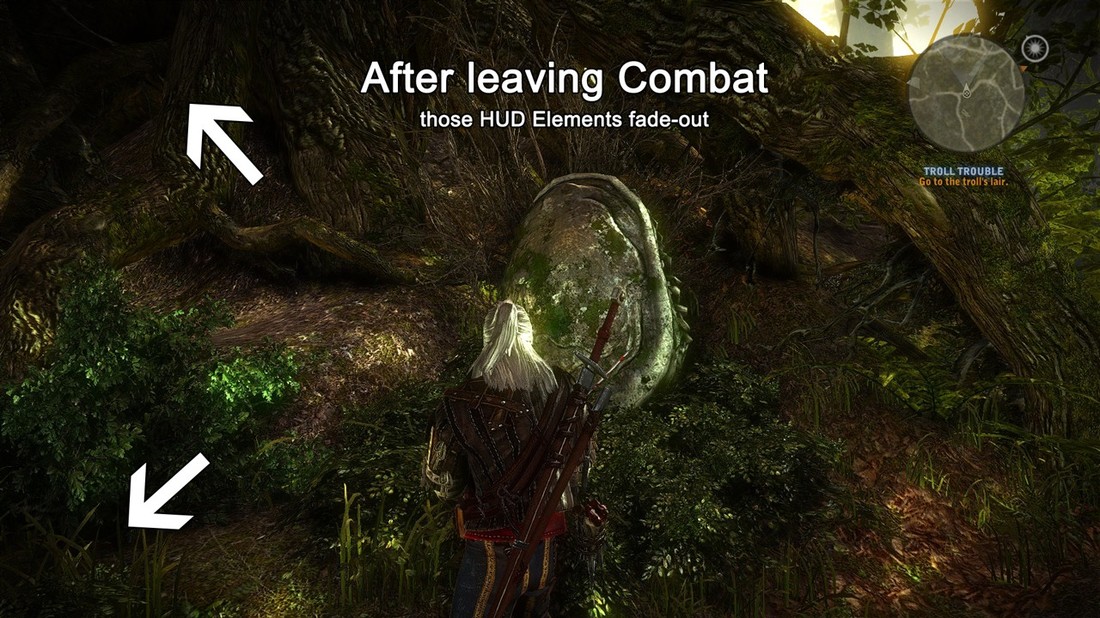
My first mod is always a mod that reduces the very obtrusive HUD elements. Often I will find myself watching a minimap in game instead of enjoying the environment. Dynamic HUD is a mod that dynamically adds and removes HUD elements to keep the display as clean as possible whilst still being functional.
|
|
1. There are various files to choose from, I chose the Hardcore Edition because it also removes the minimap and this makes better screencaps but the choice is up to you. Select the one that suits you best and download it to a folder of your choosing, make sure it is in a manageable location.
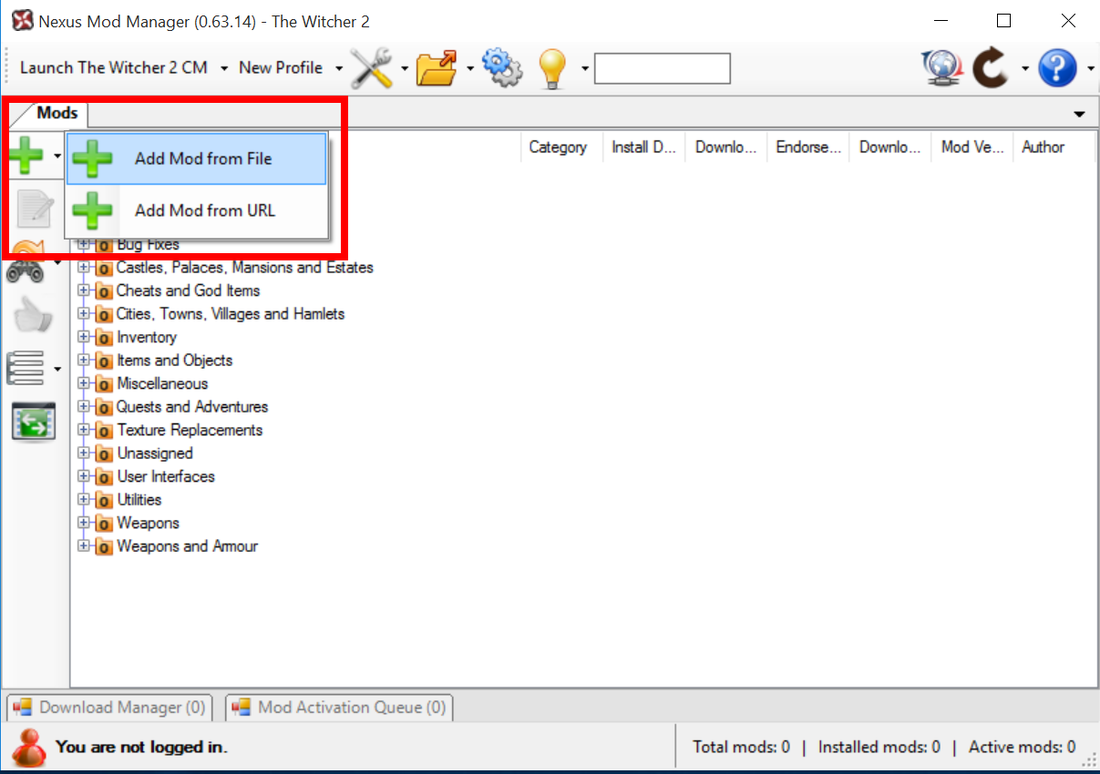
2. Next open NMM and select the drop down menu to "add a mod from file".
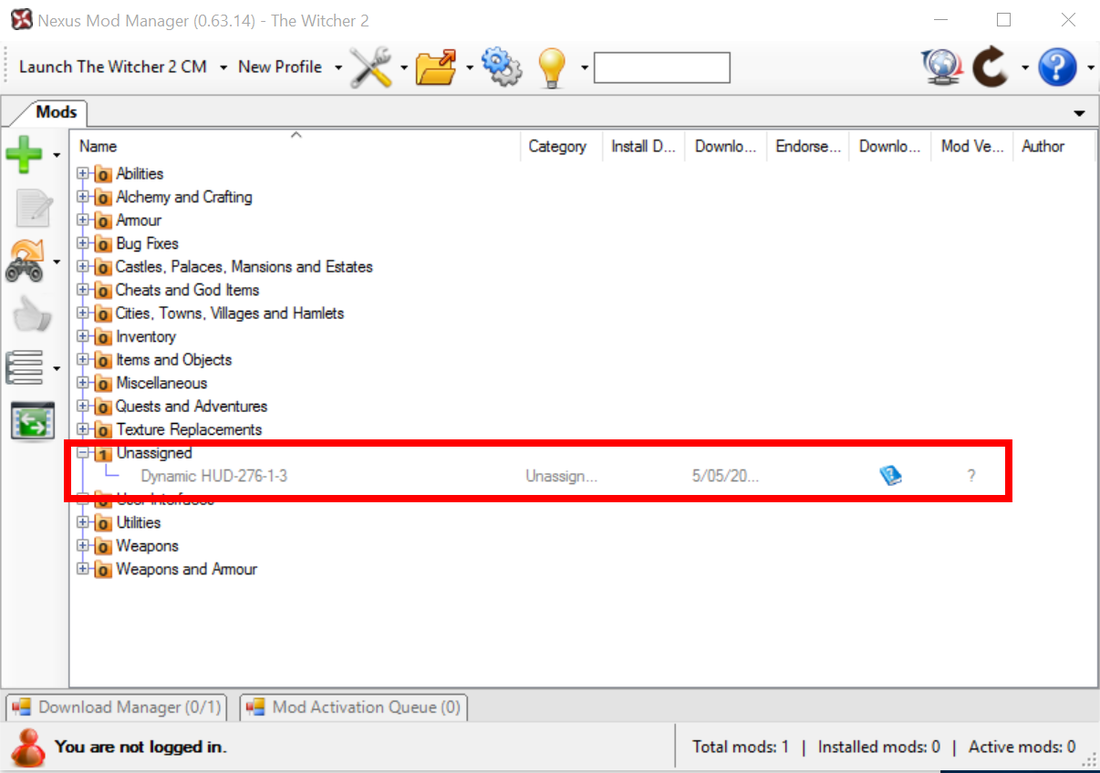
3. Next navigate to the mod you just downloaded and add it to the manager. It will now appear within the list of mods you have available. double click the mod and it will install. If installation was successful a green tick will appear next to the mods name. You can move it to a new category simply by dragging it with the mouse and dropping it under the new category.
4. The final step to installing any mod is to test it out, so load the game and see if there is any difference in the HUD, if all is well then you may proceed to the next step.
Increase the text size.
If you are playing on a high resolution setting or you are sitting far away from your screen you may find the text difficult to read. The Comfy Couch mod will increase the font size and adjust the text color to make it easier to read.
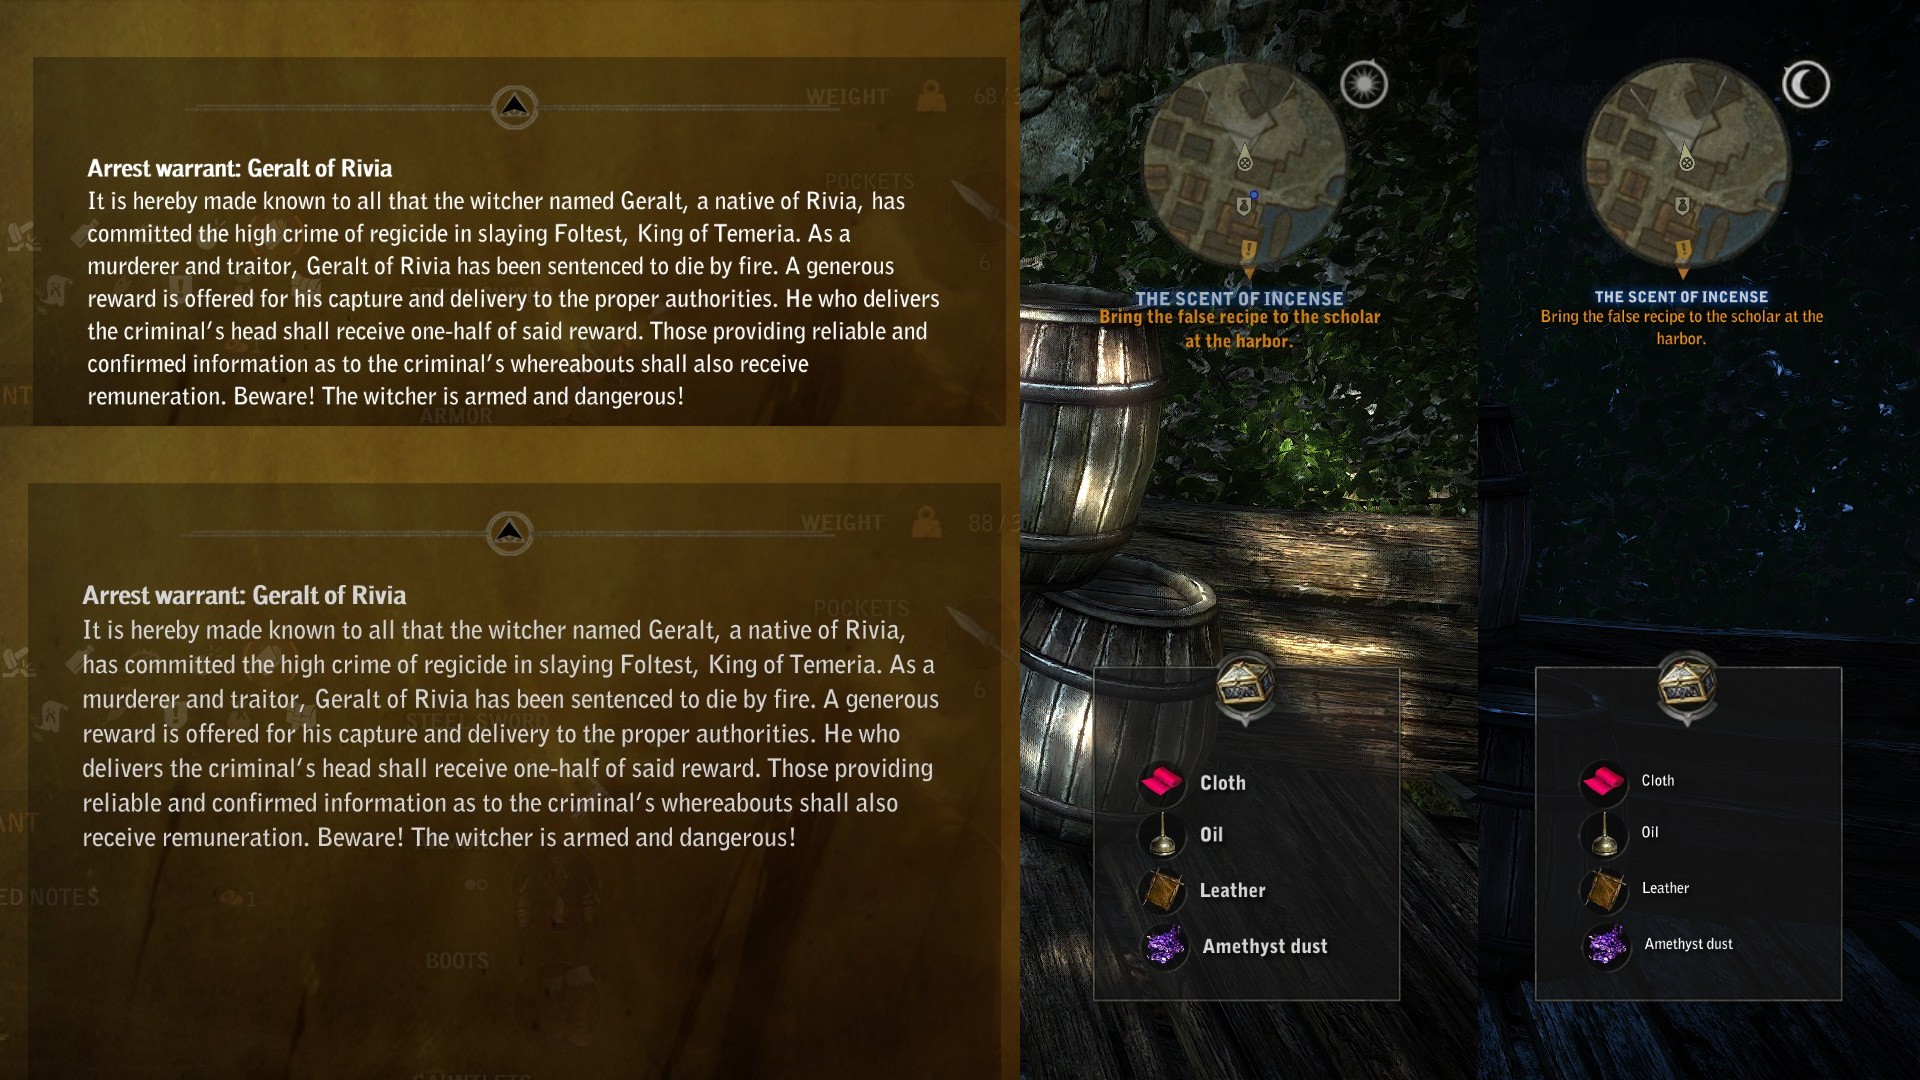
Before and after applying the Comfy Couch mod comparison.
1. Choose the mod version you wish to use. If you did NOT install the Dynamic HUD mod then choose the version in the blue box, otherwise choose a version from the yellow box. I personally chose the 'Big and Bold' version.
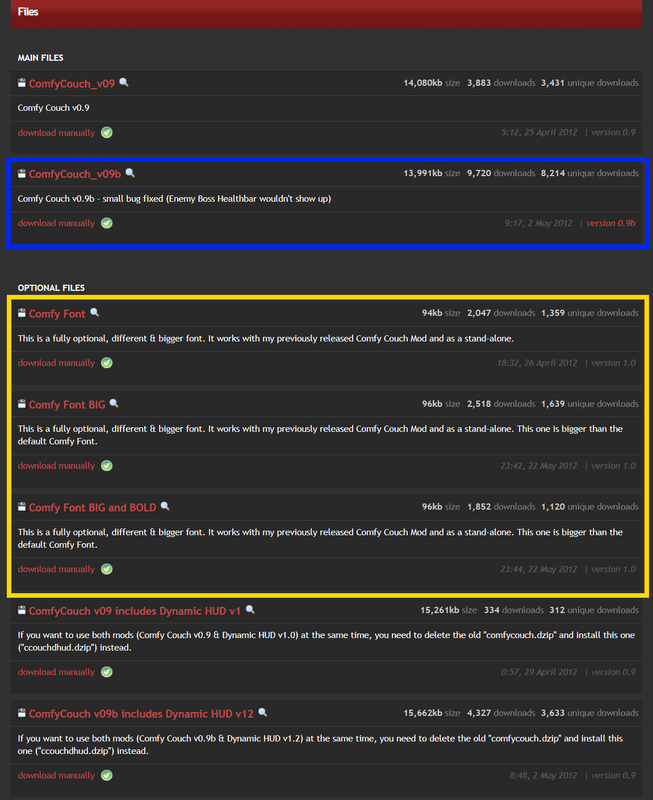
Select which version of Comfy Couch you wish to run.
2. Activate comfy couch in the same way as the previous mod.
3. Because Comfy Couch needs to load first you need to go into your 'CookedPC' folder within your game directory and rename the Comfy Couch file so that it has an _ at the beginning of it's name. Depending on the version you installed the file will have a different name, if your having trouble finding it then open the 'CookedPC' folder and activate the mod whilst watching the files within the folder, this way you will be able to see it appear.
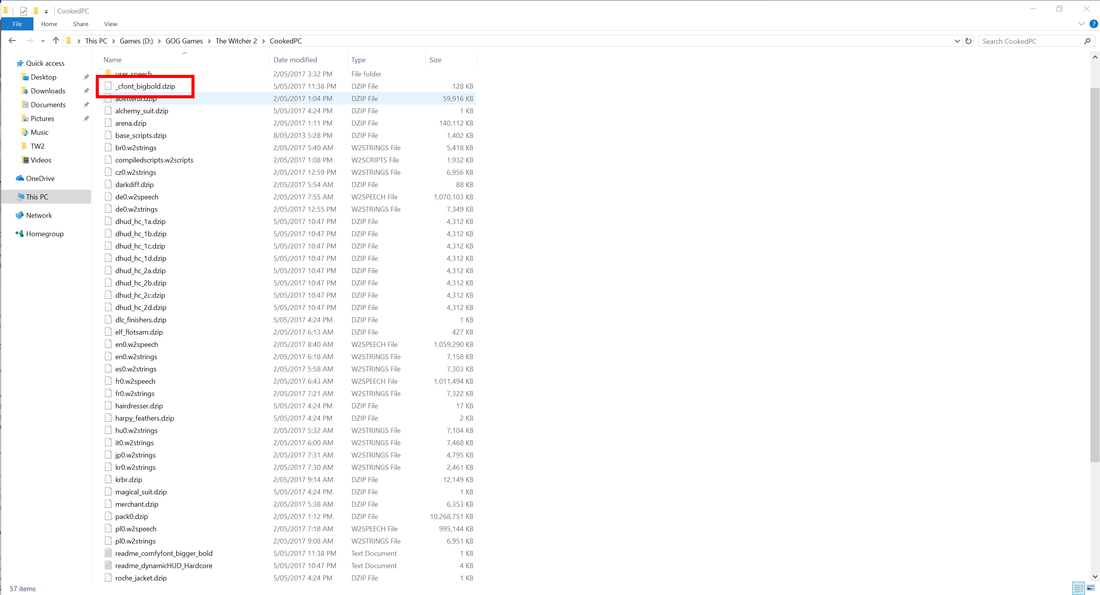
rename the Comfy Couch mod so that it starts with an underscore.
4. As usual it goes without saying (and this will be the last time I will say it) but run the game to see if the mod has been applied properly.
Skip the intro movies & save some time.
If pushing Esc five times is too much work then the Intro Logo Removal mod will cut this task out of your life. Install it in the same manner as the previous two mods. If you are running the steam version then this mod will not work (should have got the GOG version hey?) but there is still a work around for it in this thread. Unfortunately there is no way to skip the 'CD Projekt Red' splash screen.
To further save time you can circumvent the need to launch through GOG or the Launcher (unsure how this works on the steam version, let me know in the comments below!) by navigating to the "bin" folder in your install directory and creating a shortcut to the 'witcher2.exe' on your desktop.
To further save time you can circumvent the need to launch through GOG or the Launcher (unsure how this works on the steam version, let me know in the comments below!) by navigating to the "bin" folder in your install directory and creating a shortcut to the 'witcher2.exe' on your desktop.
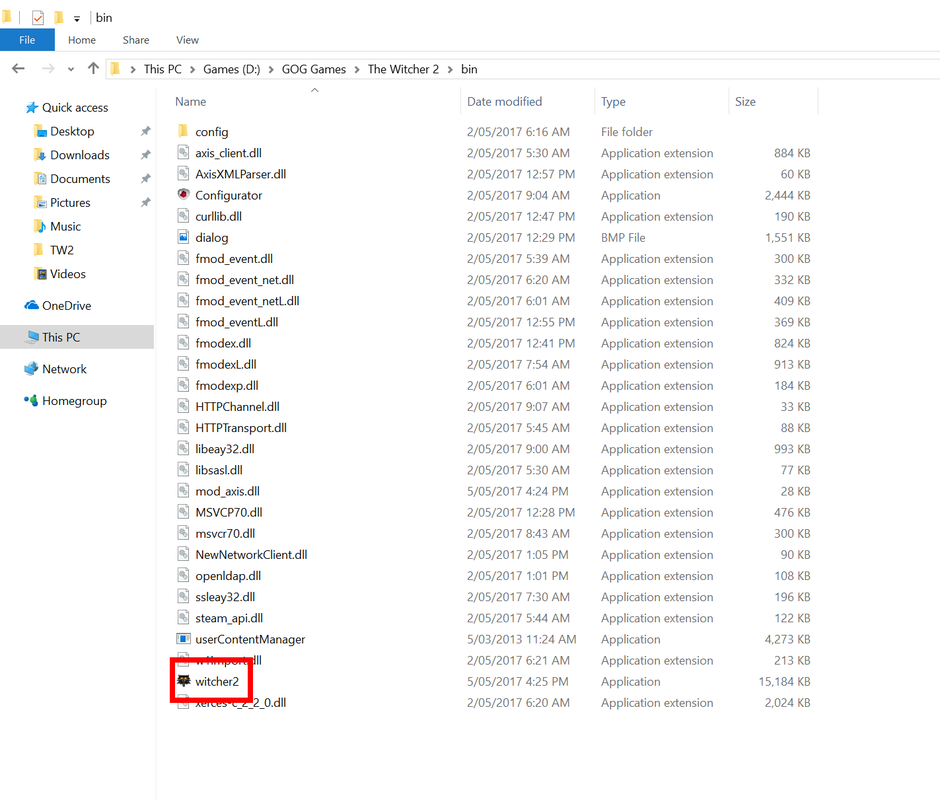
Create a shortcut to the 'witcher2.exe' on your desktop.
Modding - bug fixes.
There are six bugs that can be fixed via mods. The first five can be installed using the download -> add to NMM -> activate with NMM technique we have used for previous the previous mods.
Grass Color Fix
Fixes the bright neon grass immediately around Geralt, see images on mod page.
Grass Color Fix For Vergen
Same as the Grass Color fix except for a different part of the game.
Radovid Persuasion Fix
Fixes a bug that prevents a successful persuasion during a conversation. there are two versions available, one makes the persuasion attempt never fail, the other keeps the required persuasion level from the game. Your choice if you want to take the easy path or the right path ;)
Circles of Power - Vigor Bug Fix
The 'Circle of Vigor' in the game gives you the same effects as the 'Circle of Life' does. This mod fixes that.
Whirl of Oil Hotfix
Because the game uses the same recipe for this and another oil you can only ever make the other oil. This mod alters the 'Whirl of Oil' recipe so that it is unique. You cannot use this mod and the 'Weightless Recipes and Schematics' mod (see Game play changes below) at the same time, choose one or the other.
Story Ability Bug Fixes
During the game as the story progresses Geralt learns new abilities. Unfortunately some of these abilities are not applied properly and therefore never learnt. This mod fixes this so Geralt can learn all the abilities he is supposed to. This bug fix is a little more difficult to enable as it cannot be done using NMM. The mod author recommends the following approach to installing the fix.
5. Replace the original pack0.dzip with your new one.
1. Use Gibbed's REDTools to extract your pack0.dzip. Back this up, it's really big and would take a while to redownload!
First download Gibbed's RedTools from here.
Extract that file to a folder of your choice.
Open command prompt (see here if you don't know how).
Drag and drop 'Gibbed.RED.Unpack.exe' into the command prompt window.
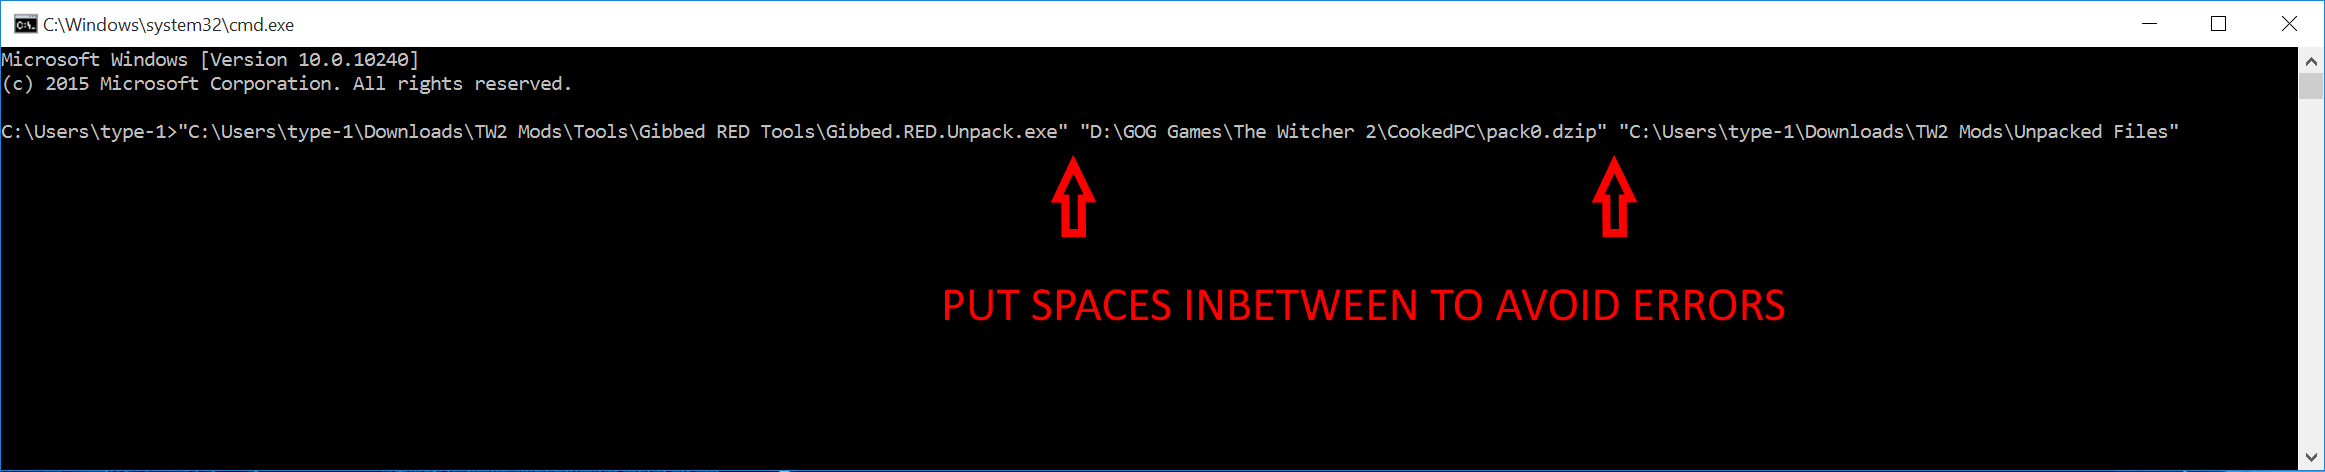
Next locate 'pack0.zip' which is located in the 'CookedPC' folder within the game directory. Make a back up somewhere. then drag pack0.zip into the command prompt window too. Make sure there is a space between the two directories in the command prompt (see below picture).
Now you need to make an output directory for the unpacked files. I made this folder in the same place I have been saving my mods. Now drag the folder into the command prompt window too, also ensuring that there is a space between the directories (see below picture).
First download Gibbed's RedTools from here.
Extract that file to a folder of your choice.
Open command prompt (see here if you don't know how).
Drag and drop 'Gibbed.RED.Unpack.exe' into the command prompt window.
Next locate 'pack0.zip' which is located in the 'CookedPC' folder within the game directory. Make a back up somewhere. then drag pack0.zip into the command prompt window too. Make sure there is a space between the two directories in the command prompt (see below picture).
Now you need to make an output directory for the unpacked files. I made this folder in the same place I have been saving my mods. Now drag the folder into the command prompt window too, also ensuring that there is a space between the directories (see below picture).
Now hit 'Enter' and let the the program unpack. This could take some time depending on your system.
2. Copy the mod pack0 folder's contents into your unpacked pack0 folder. Overwrite the files.
You can do this by extracting the 'Story Ability Bug Fixes' mod and then opening the 'Pack0' folder and copy pasting the 'abilities' and 'game' folder within into your unpacked directory. Allow the files to be overwritten.
You can do this by extracting the 'Story Ability Bug Fixes' mod and then opening the 'Pack0' folder and copy pasting the 'abilities' and 'game' folder within into your unpacked directory. Allow the files to be overwritten.
4. Repack your pack0 folder with Gibbed's REDTools.
This is the exact same process as unpacking, except in reverse. First drag the 'Gibbed.RED.Pack.exe' (as opposed to the 'Unpack' version) into the Command Prompt window. Then drag your unpacked folder into the window as well, like before remembering to include a space in between and hit 'Enter'. Again the repacking process can take a while. Unfortunately there is no visual feedback to tell you when it is complete however looking at CPU usage in the task manager will give an indication of when the system has returned to idle.
Once you are sure it has finished packing your files close Command Prompt.
Now you will need to rename the new file to 'pack0.dzip' (it will be in the same folder as the extracted files) and copy it into the 'CookedPC' folder of your game directory. Overwrite when prompted.
Congratulations! If you can successfully run the game you have now implemented the final bug fix.
Game play changes.
Weightless Recipes and Schematics mod will make recipes and schematics not weigh anything (default was 0.1) and will make books weigh 0.3 (default was nothing) which is more realistic in my opinion. Install it using the download -> add to NMM -> activate with NMM technique.
You cannot use this mod and the bug fix 'Whirl of Oil' so choose one or the other.
You cannot use this mod and the bug fix 'Whirl of Oil' so choose one or the other.
Visual enhancements.
The first major visual enhancement is the Extreme Flora Overhaul mod. This mod changes the LOD for the foliage meaning that foliage will be rendered at maximum quality at a much greater distance. This also means that there will be a significant performance hit. The below video demonstrates the changes this mod will bring.
Do not use the mod manager to install this mod! Instead perform the following steps (taken from the readme):
1. Head to your documents folder, and look for a folder called Witcher 2. Open it.
2. You will have up to four folders inside: Config, Downloads, gamesaves, and UserContent. You may not have Downloads, but that's okay. You -will- need UserContent. If the UserContent folder does not exist, create it.
3. Unzip the extreme_quality_flora folder in the supplied archive into the UserContent folder. The directory should then look like:
/Documents/Witcher 2/UserContent/extreme_quality_flora
4. Start The Witcher 2 launcher. Click "Mods". Tick the box next to extreme_quality_flora. Either "Save and Exit" then boot the game yourself, or hit "Save and Run" to boot the game right away.
After doing these steps you can return to using the shortcut you have created to launch the game.
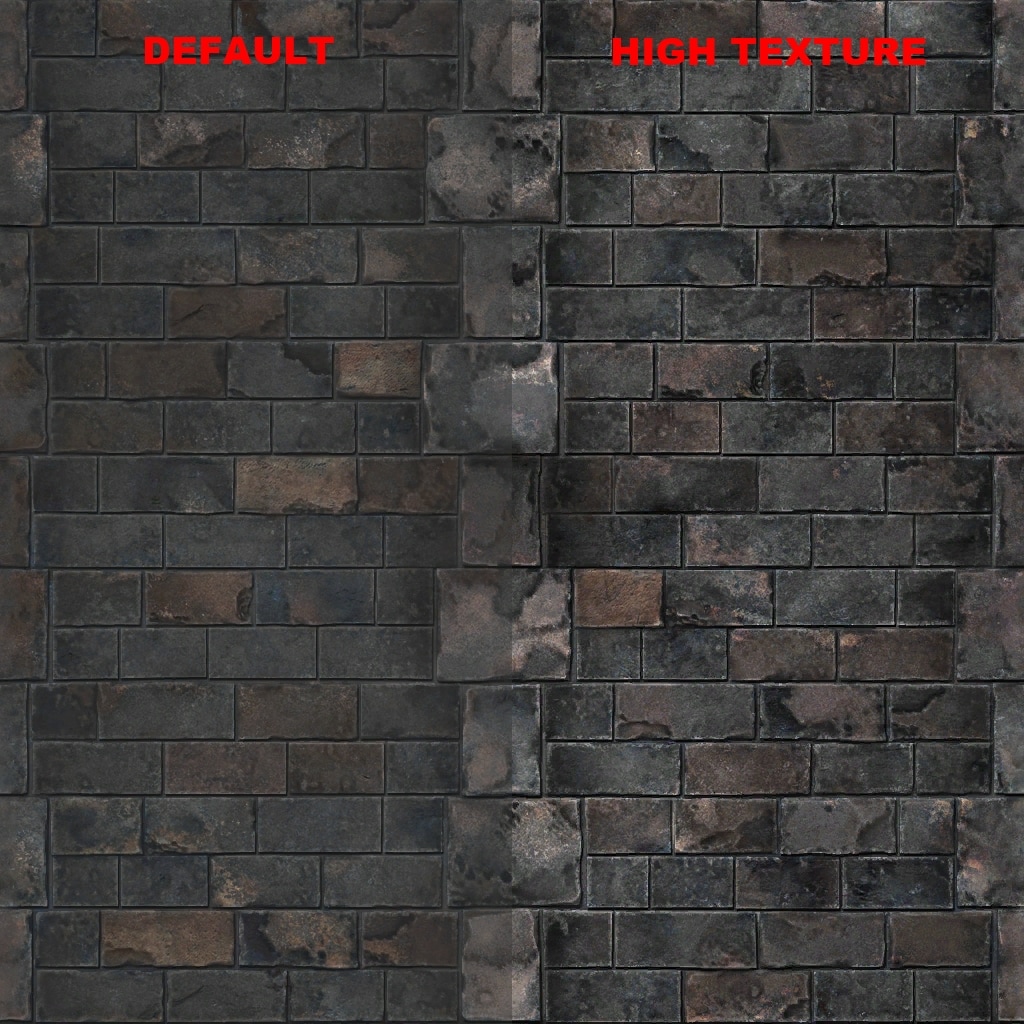
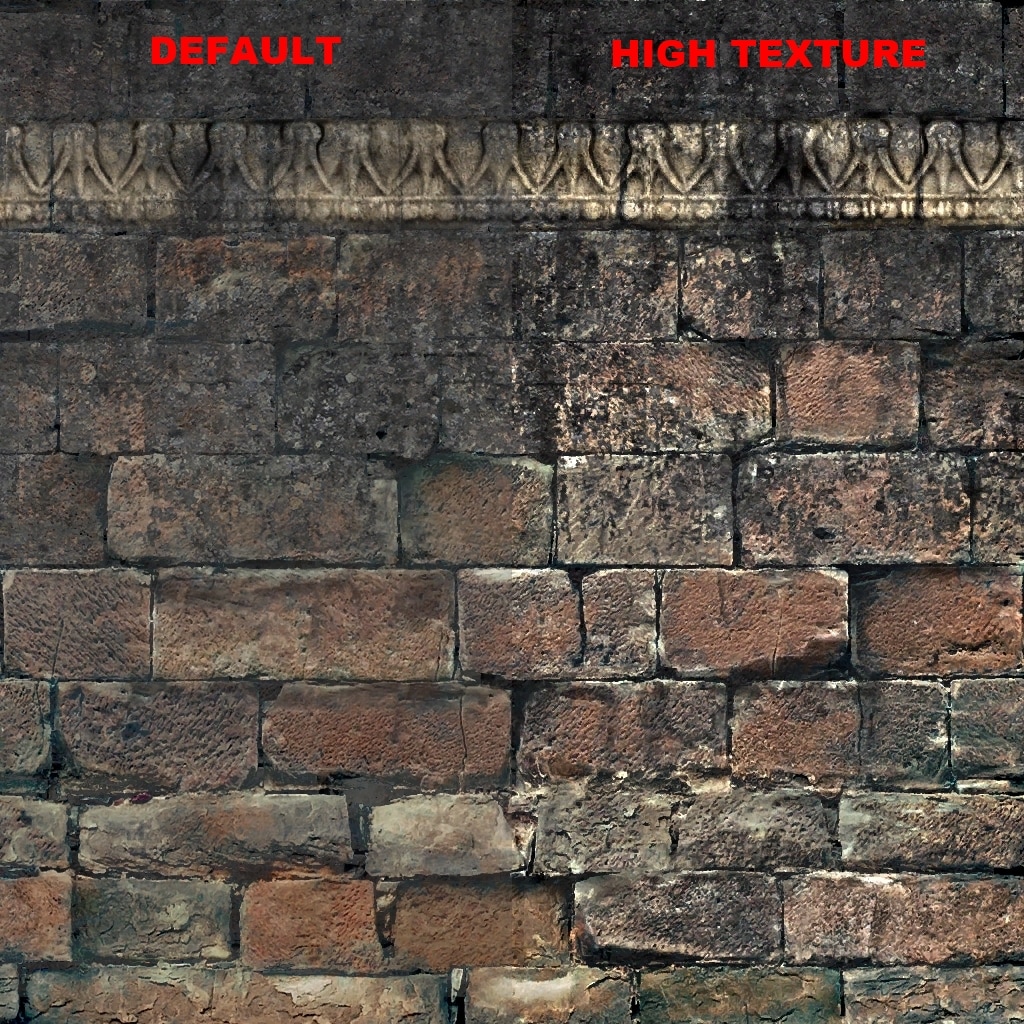
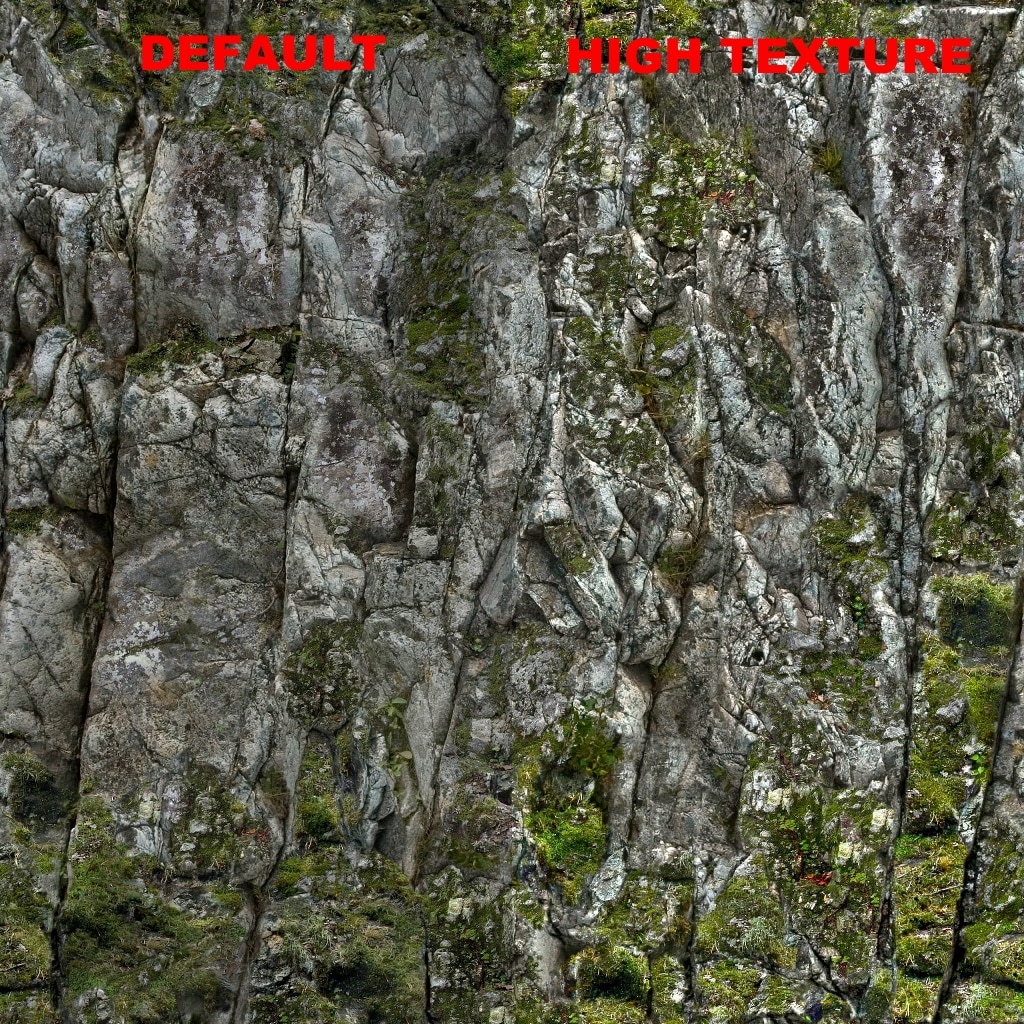
The next visual enhancement mod to install is the Better Texture Environment mod. This mod is actually has two files; to install, the 'Better Texture Environment' file and the 'High Texture Weapons' file. Download both of these.

|
|
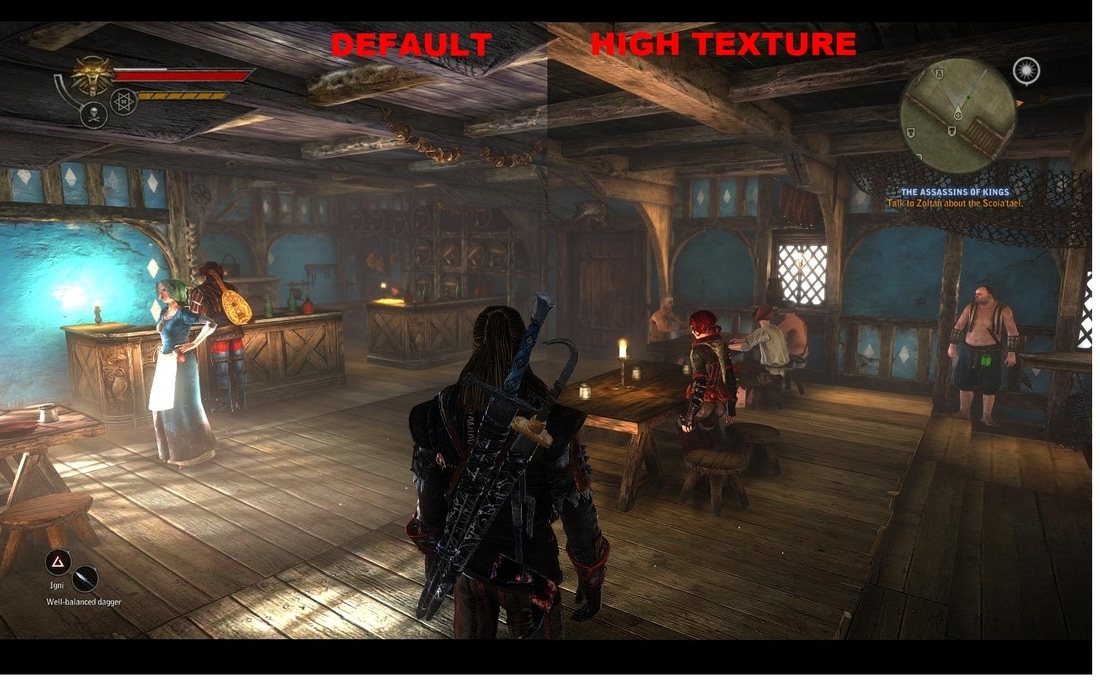
To activate the 'Better Texture Environments' mod extract it into your download folder. After that copy and past the extracted 'CookedPC' folder into your Witcher 2 directory (not into the CookedPC folder) and overwrite all so that you merge it with the existing CookedPC folder.
Repeat this same process for the 'High Texture Weapons' file.
Some textures are bugged so you need to delete those. Find the following files and delete them from the extracted mod:
\CookedPC\environment_levels\mini_games\dices\tex\mg_board_2.xbm, mg_board_2_n.xbm, mg_board_2_s.xbm (3 files)
\CookedPC\environment_levels\architecture\dwarf_city\exterior\textures\dwarf_statue01.xbm, dwarf_statue01_n.xbm, dwarf_statue01_s.xbm (3 files)
\CookedPC\items\work\remains_human_01 (one whole folder)
\CookedPC\items\geralt\geralt_signs\yrdentrap.w2ent (1 file)
Final tweaking.
The Witcher 2 Tweaker can be used to adjust many settings that are not revealed in the games options. Download and extract this program.
Make sure that your C:\Users\*YOUR USER NAME*\Documents\Witcher 2\Config\User.cfg is set not set to read only by right-clicking it, selecting properties and removing the check box in the Attributes section. If you do not do this the changes will not be applied.
You can now launch the program, the most important options to change are "Maximum Spot Shadow Count' and 'Foliage Distance Scale'. Default is 1 for both, setting it to 3 will give a major boost to the environment but hit hard in performance. Test out a variety of values here until you find ones you like. If you have a GPU with large quantities of vram going to waste then also increase the 'Texture Memory Budget' but don't set it too high otherwise you may run out of vram! When you are done click the 'Accept changes' button and exit. Note that if you use the default option menu to make changes it will overwrite the changes made here.
Furthermore the game never applies the correct shadow settings so refer to the presets and copy those values over, otherwise you will be running the lowest quality shadows in game.
Finally the last setting I would suggest you play with is the 'Allow Sharpening' setting. This comes down to personal preference so test both options and stick with the one you prefer.

