
The problems... so many problems.
This game is quite possibly the most horrendous console port in history, with numerous issues that diminish the gameplay experience. In some cases even making it impossible to play this game. fortunately the modding community has managed t fix these issues mostly, allowing an enjoyable experience on PC. The following issues are addressed in this guide:
- Framerate capped at 30 fps
- Resolution locked to 720p
- Multi-monitor black screen
- Misc multi-monitor display issues
Step 1 - the right game version.
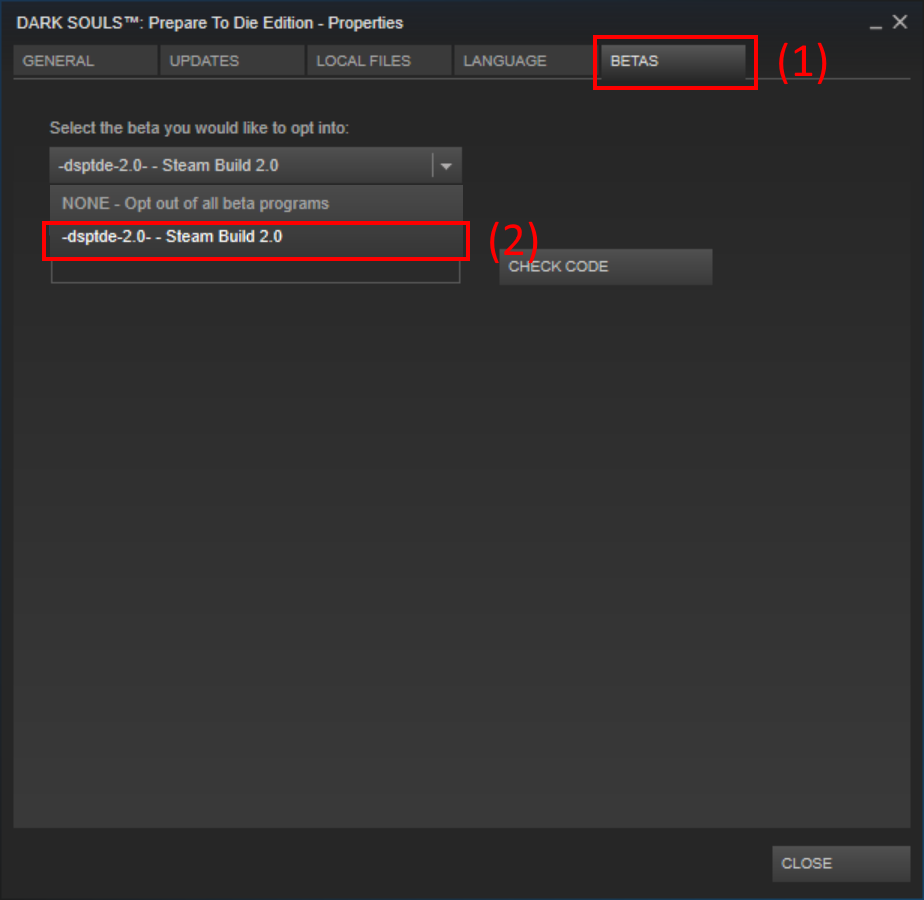
There are various versions of this game available on PC, to enable these fixes you will need to run a specific version of the game. First of all, if you are running the "Games for Windows Live" version then you are out of luck, these fixes will only apply to the steam version of the game. Once you have the game installed on steam run it once. As soon as you get to the main menu exit the game again (Alt-F4). Now go to Steam and right click Dark Souls, then select "properties". In this menu select the "BETAS" tab (1) and from the drop down menu select the "-dsptde-2.0- - Steam Build 2.0" beta (2). The game will download a small update and then you will be ready for the next step.
The Fix.
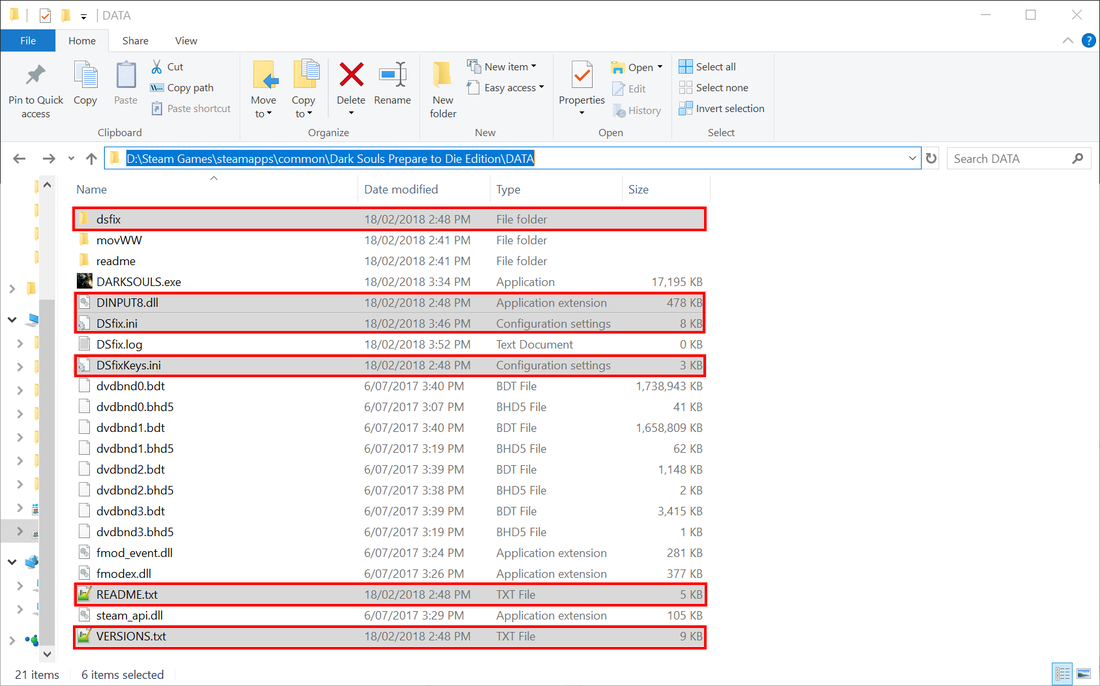
Modder Durante has made a fix that will allow an unlocked framerate, render at native resolutions as well as improved graphical fidelity, nothing will work without this mod. You can download DSFix 2.4 here. Once that has been downloaded extract the contents into your\steamapps\common\Dark Souls Prepare to Die Edition\DATA directory. You should now have these six files within that directory:
|
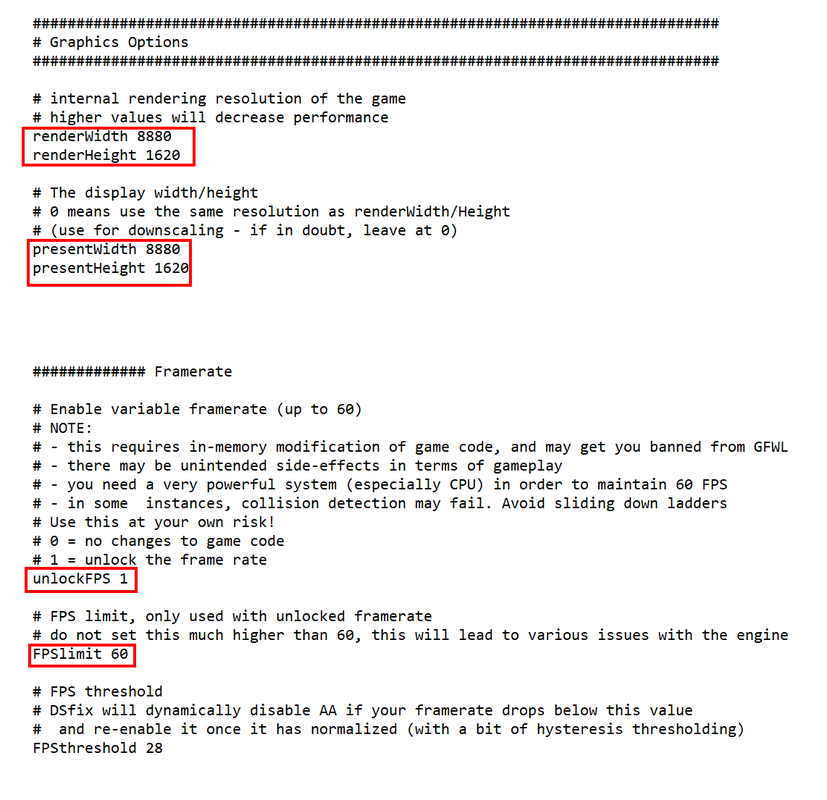
Next open the DSfix.ini file and set the following values:
renderWidth - set to your resolutions horizontal size (example 1920 for a 1920x1080 display) renderHeight - set to your resolutions vertyical size (example 1080 for a 1920x1080 display) presentWidth - 0 presentHeight - 0 unlockFPS - 1 FPSlimit - 60 In the example pictured I have a resolution of 8880x1620. It would also pay while you are here to locate antialiasing settings and ambient occlusion settings and apply the desired values as well. Once you have the values set correctly for your system save and close this file. |
|
Next navigate to C:\Users\**YOUR USERNAME**\AppData\Local\NBGI\DarkSouls directory and open DarkSouls.ini with notepad. In this file set your Width and height to match desired resolution, set ColorDepth to 32, Refresh rate to 60 and Antialiasing to 0, then save and exit. You will now be ready to play Dark souls at 60 fps at your native resolution.
Multi-monitor & widescreen setups.
This game has various issues when it is run on a surround/eyefinity display, the most obvious is that the game will just display a black screen. If you do manage to get an image on screen then the HUD and cutscenes will be stretched Fortunately there is a simple fix available for these issues too in the Form of Widescreen Fixer, available here. You will need to download this program and extract it somewhere you find convenient. Unfortunately the plugin for Dark Souls that comes with Widescreen Fixer does not work, so you will also need to download the dark Souls plugin from 3dsurroundgaming (plugin #7). Once you have downloaded that then navigate to wherever you installed widescreen Fixer and replace the old plugin (inside the "Plugins" folder) with the new one you have just downloaded.
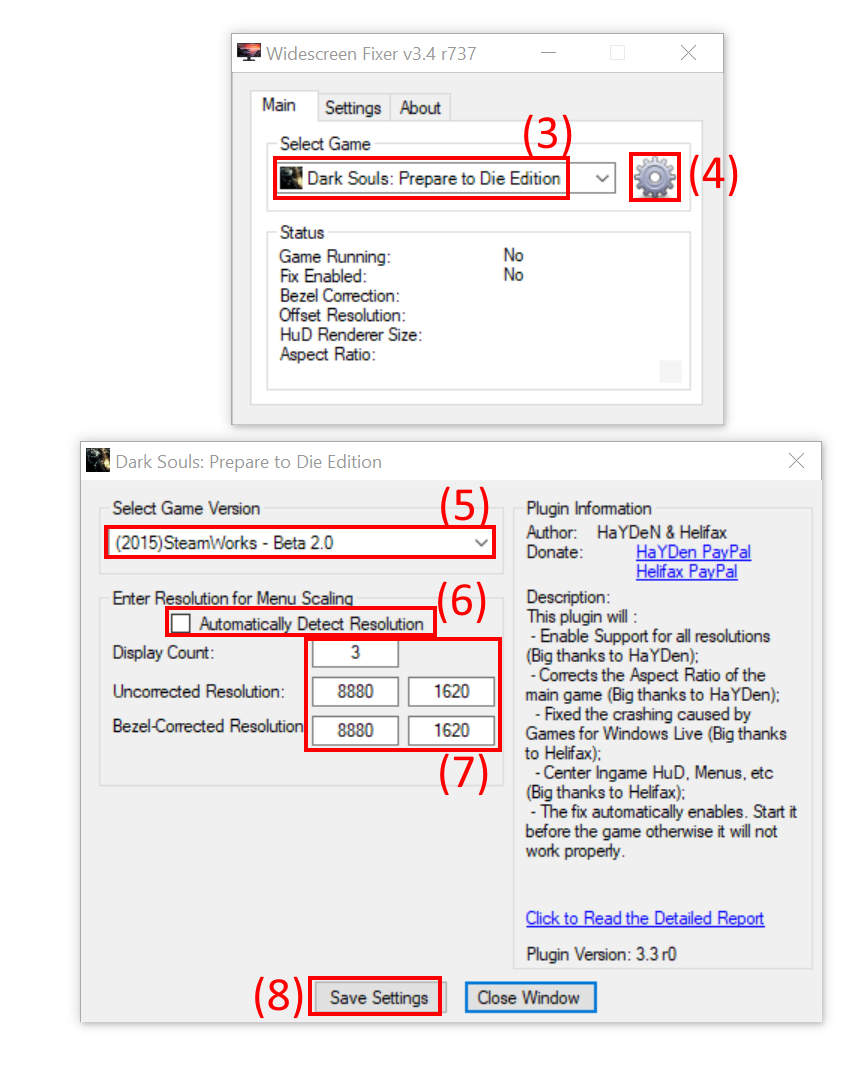
Next open Widescreen Fixer and select Dark Souls: Prepare to Die Edition from the drop down menu (3) and then click the Settings icon (4). In these settings select the "(2015)SteamWorks - Beta 2.0" version from the drop down menu (5), uncheck the "Automatically Detect Resolution" checkbox (6) and then manually enter your resolution details in the appropriate fields (7). After that click the "Save Settings" button (8).
In order for this fix to work Widescreen Fixer needs to run in the background and be opened before the game launches. It will take a moment before it begins to work though.
Dark Souls HD Texture Pack.
Dark Souls HD Texture Pack is a high resolution texture pack, it will add more detail to the game. First open DSfix.ini again and change "enableTextureOverride 0" to "enableTextureOverride 1", then save and exit. Next download the mod from here under the "Files" tab. Once it has downloaded extract it's contents into the "steamapps\common\Dark Souls Prepare to Die Edition\DATA\dsfix\tex_override" folder.
The below slideshow shows the difference in image quality that you can expect, there are many more screen shots on the mod page. Note that I have selected version 3.0Lite as opposed to the performance edition.
The below slideshow shows the difference in image quality that you can expect, there are many more screen shots on the mod page. Note that I have selected version 3.0Lite as opposed to the performance edition.
Dark Souls Flora Overhaul.
This mod drastically improves the quality of the flora in game. to install open DSfix.ini again and change "enableTextureOverride 0" to "enableTextureOverride 1" if you haven't already, then save and exit. Next download the mod from here under the "Files" tab. Once it has downloaded extract it's contents into the "steamapps\common\Dark Souls Prepare to Die Edition\DATA\dsfix\tex_override" folder as you did for the Dark Souls HD Texture Pack.
The below slideshow shows the difference in image quality that you can expect.
The below slideshow shows the difference in image quality that you can expect.
High-Res UI and Subtitle Fonts
This mod sharpens the text in game by increasing its resolution. The process for installing this mod is identicle to the previous two mods, to install open DSfix.ini again and change "enableTextureOverride 0" to "enableTextureOverride 1" if you haven't already, then save and exit. Next download the mod from here under the "Files" tab. Once it has downloaded extract it's contents into the "steamapps\common\Dark Souls Prepare to Die Edition\DATA\dsfix\tex_override" folder as you did for the Dark Souls HD Texture Pack.
The below slideshow shows the difference in image quality that you can expect.
The below slideshow shows the difference in image quality that you can expect.
Downsampling.
Down sampling is a technique in which the game is rendered at a much higher resolution than the monitor is capable of displaying and then the picture is down sampled to match the display's resolution. By doing this anti-aliasing is applied to everything in game, but at the cost of fps. Nvidia users without sli and running standard resolutions can use DSR to perform down sampling or by creating a custom resolution in nvidia control panel to enable higher resolutions in game. AMD users have access to something similar, though without an AMD system I am unable to test this (comment below and let me know). Finally users that are running sli or multi monitors can use this method to down sample and get rid of those jaggies. Choose the method below that best suits you and follow those instructions.
|
|
|
